All global audio settings
A comprehensive overview of (almost) all of Behringer WING's global audio settings, including sample rate, main/alt input sources, solo modes, and the integrated USB audio interface.
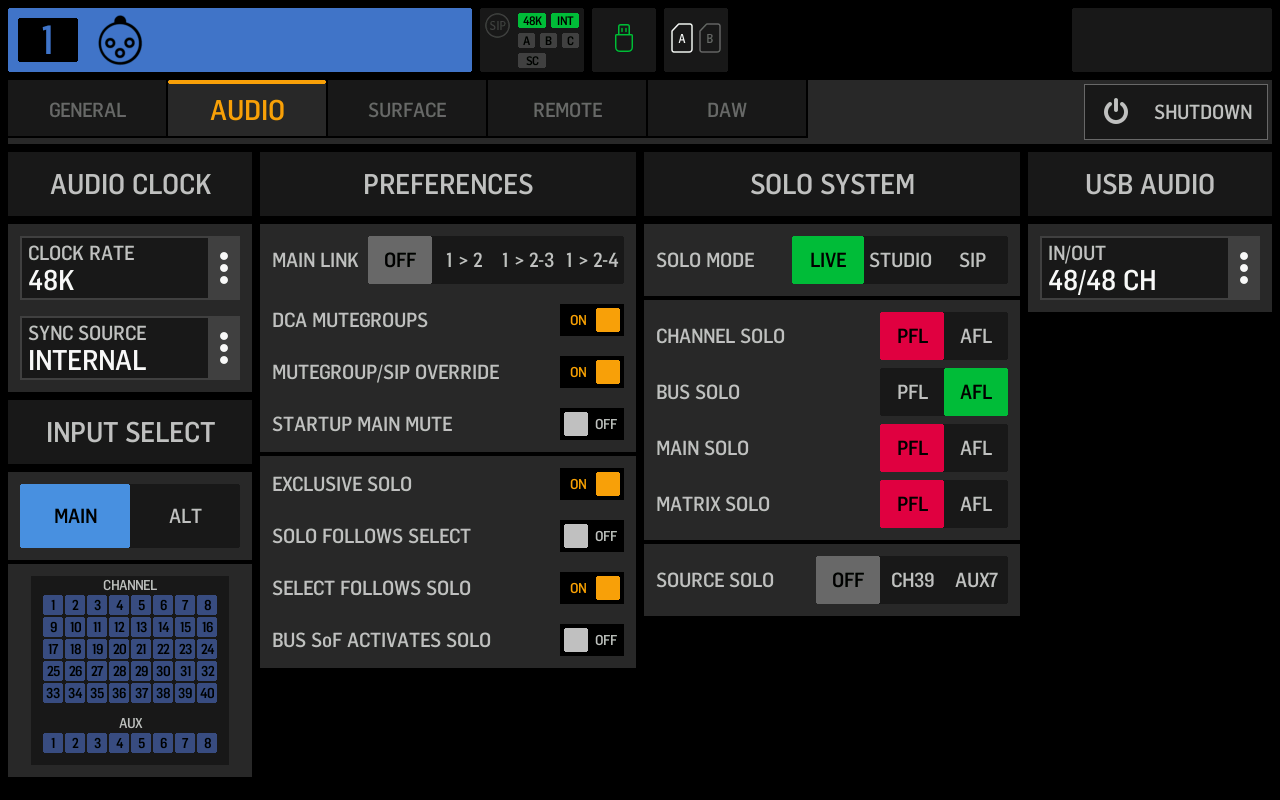
Click or tap a setting to jump to the corresponding reference entry.
Audio Clock: Clock rate
The clock or sample rate defines how many audio samples the console will process per second. There are two typical sample rates: CD Audio uses 44.1kHz, and professional music production uses 48kHz or a multiple of it (such as 96kHz or 192kHz). I recommend you chose your sample rate based on which your digital inputs and outputs. The WING doesn't support sample rate conversion, so all your AES50 devices, a USB-connected PC, SD-card playback and recording, as well as USB-drive playback and recording, have to use the same rate. AES50 connected stage boxes will automatically adopt the WING's sample rate if the WING is the sync source.
If you do multitrack recording via a PC or the integrated WING Live Card, you'll want to use the sample rate that the rest of your project uses.
If you already have a USB-drive full of songs for your break, music chances are that it's 44.1kHz, so that might be a convenient choice.
Audio Clock: Sync source
The sync source or clock master is the device that controls the shared audio clock. This clock synchronizes sample playback and transmission. In a typical live setup consisting of one console and one or more connected stage boxes, you'll want to have the WING's internal clock as the sync source.
If you're using two consoles, you should make the gain master the sync source. Let's say that you're running a WING at front-of-house and an X32 for monitors, with the X32 controlling the preamps. You connect the X32 to the AES50 A port on the WING and set the X32's sync source to internal and the WING's sync source to AES50 A.
If you're using the Dante or another expansion card, you can set it as the sync source via the "EXP CARD" option. The "AES/EBU" option refers to the two-channel XLR digital audio input on the back of the WING.
Input select
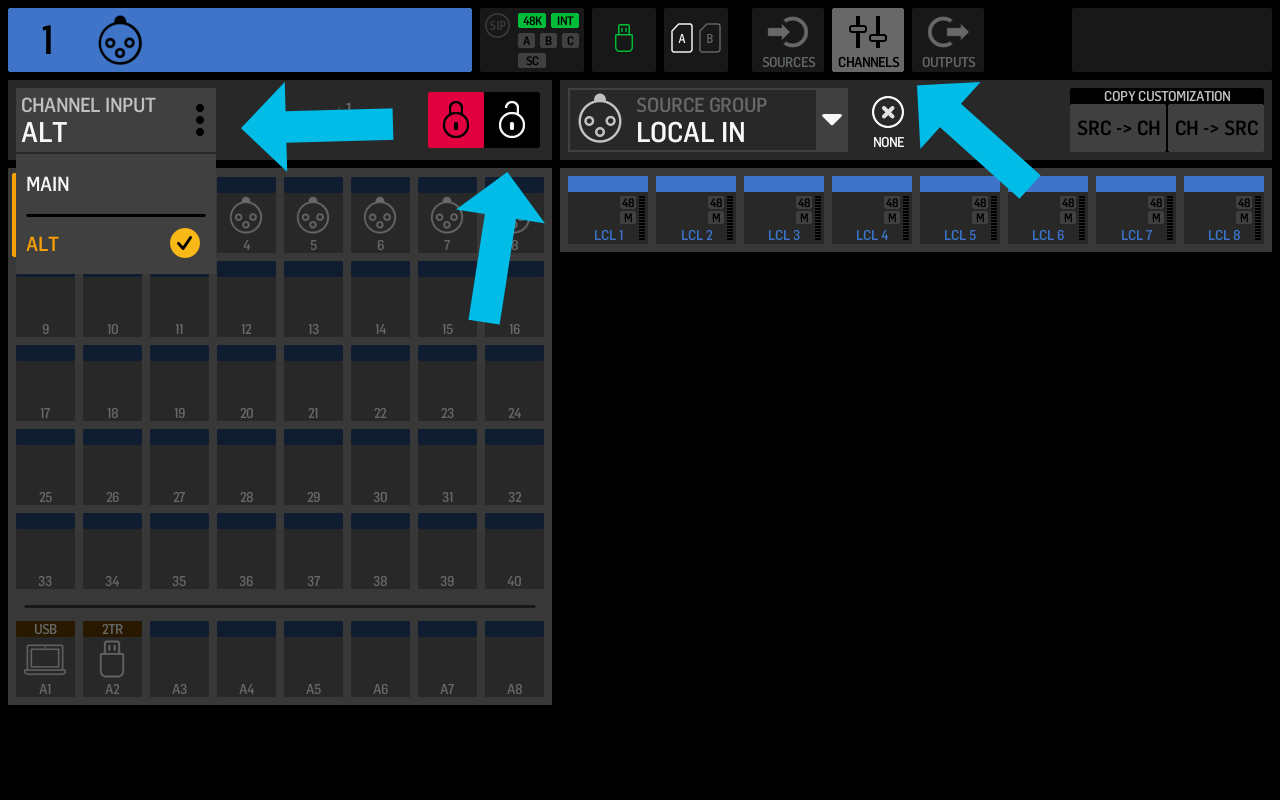
All input channels on the WING can have two sources. You use the main source for your regular live inputs, like mics and DIs, but also for CD playback or anything else you'll need throughout your show. If you have multitrack recordings of your show, add the recorder's playback as the alt source. If you switch from main to alt in the settings, you'll have a perfect virtual soundcheck environment. The input select setting in the global audio settings will switch all inputs. If you only want to change one input, you can do that in the channel's menu under the head amp settings (the second submenu). This is also where you can set up alt sources. To assign multiple alt sources at once, press the "ROUTING" button, select "CHANNELS" in the status bar, switch "CHANNEL INPUT" to alt, and disengage the lock.
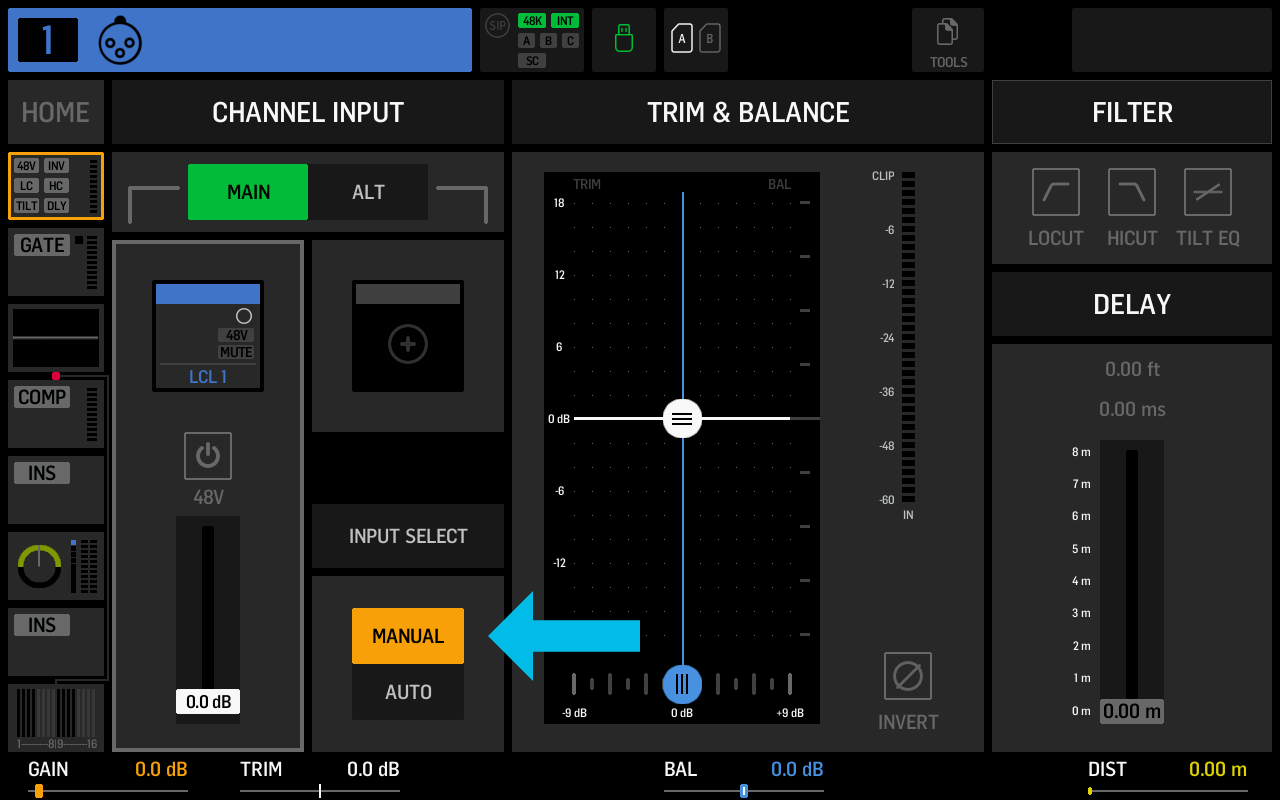
You can exclude a channel from the global channel source switch by selecting "MANUAL" instead of "AUTO" in the head amp submenu under "INPUT SELECT".
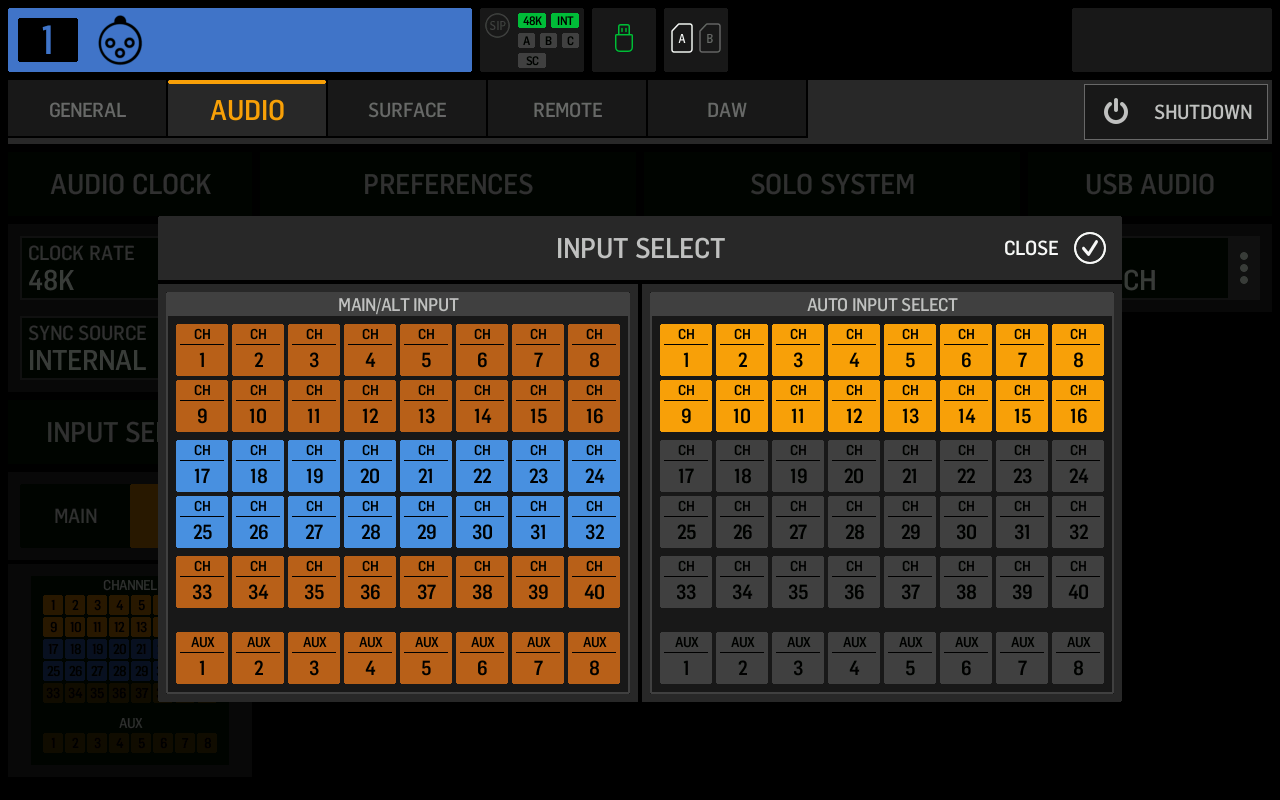
With firmware version 1.11, Behringer added an overview screen to improve the management of channel sources. By pressing the grid of channel icons in the lower left of the screen, you open the new overview. The left side lets you manually switch channels between main (blue) and alt (orange). The right side controls the automatic vs. manual mode selection for the channel. In the example below, channels 1-16 will be switched automatically, while all others will not be affected by the global setting.
Preferences: Main link
I haven't been able to figure out what this setting does.
Preferences: DCA mute groups
When enabled, the mute button on DCAs will mute the channels assigned to the DCA, just like a mute group would do.
Preferences: Mute group / SIP override
Solo-in-Place acts like a reverse mute group. If you set solo mode to SIP, all other channels will be muted as soon as you solo one or more channels. As is the case with channels muted by a mute group, the channel's "MUTE" button will flash. The red flashing indicates that the channel is muted, but not by individually muting it and instead because a mute group, DCA, or SIP solo muted it.
This override setting determines what happens when you press the mute button of an externally muted channel. The default enabled setting will cause the channel to be unmuted, thus overriding the external mute. If the override is disabled and you press "MUTE", you'll switch it into the manually muted mode, and therefore unmuting the external mute source (like a DCA) after that will not unmute the channel itself.
Preferences: Startup main mute
I recommend you enable this handy setting. It mutes your main output when you boot the console, thus preventing feedback or unwanted sounds.
Solo System: Exclusive solo
When enabled, the console will solo only one channel at a time. If you solo channel one and then press the solo button for channel two, the first channel's solo will be deactivated.
Solo System: Solo follows select
When you select a channel, it will also automatically be soloed. This setting can be useful in combination with exclusive solo.
Solo System: Select follows solo
Pressing solo will also select the channel.
Solo System: Bus Sends-on-Faders activates solo
In the Sends-on-Faders mode, faders manipulate individual sends to a single selected bus. If this setting is enabled and you enter Sends-on-Fader mode, the WING will automatically solo the bus you're mixing.
Solo System: Solo mode
Live
In the live mode, audio played through the main busses will not be affected if you solo a channel.
Studio
I haven't been able to figure out what this setting does.
Solo-in-Place
Solo-in-Place is also called destructive solo because it will mute all other channels once you press a solo button. This mode can be useful for soundchecks, but you should be careful to change it back to the live mode before the show starts. Because this mode is so dangerous, Behringer added a SIP badge to the status bar, left of the clock rate indicator.
Solo System: PFL or AFL
A PFL or Pre-Fader-Listen solo takes the soloed channel's audio without taking the fader into account. The level set by the fader will not affect the volume in your headphones. It can be useful to set a PFL dim level in the monitoring settings (press the "VIEW" button on the surface to access them).
An AFL or After-Fader-Listen solo applies the fader level to the channel's solo. Therefore channels with a lower level will be quieter on the monitors, and channels with a higher level will be louder. This mode preserves the relative volume differences of channels when you listen to them together.
Solo types can differ for channels, busses, mains, and matrixes.
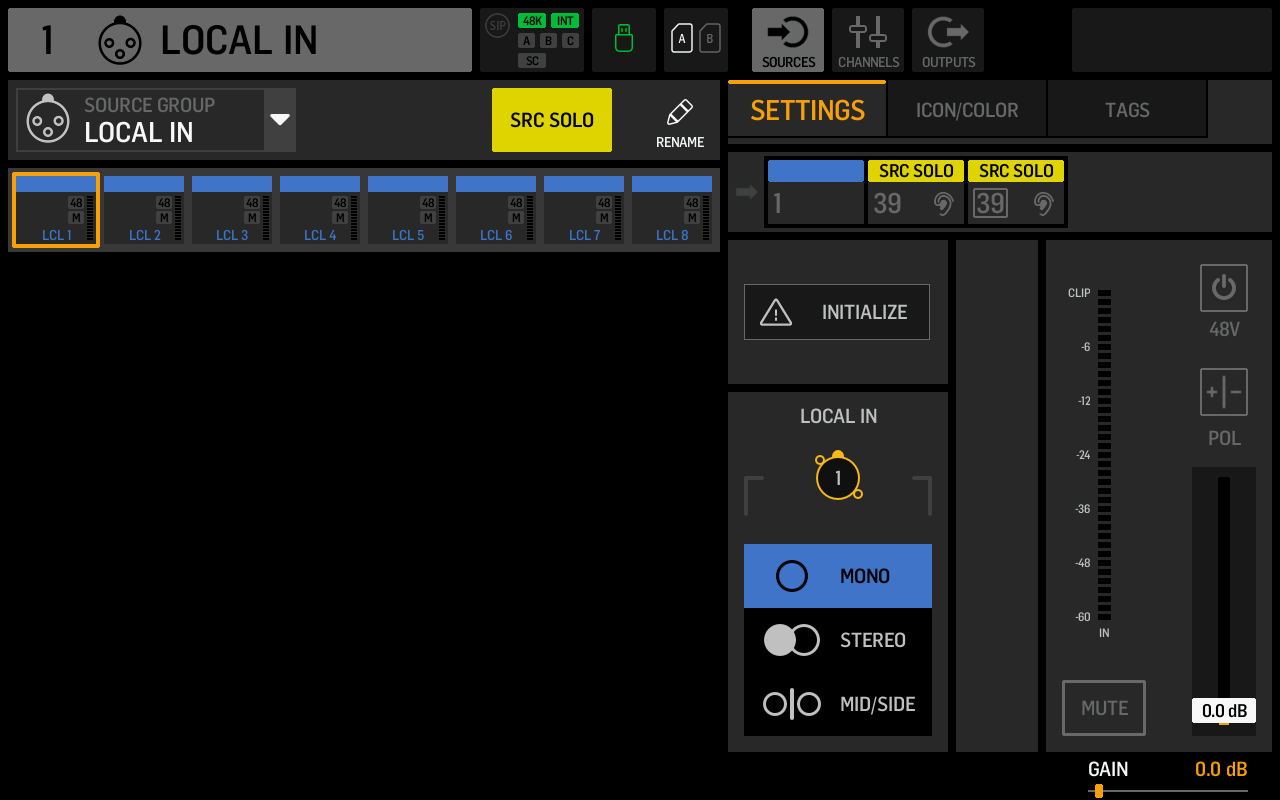
Solo System: Source Solo
Introduced with firmware version 1.11.
If you select either CH39 or AUX7, the WING will automatically customize the corresponding channel with an icon and label and set it to be used as the source solo.
You can tap the SRC SOLO button on the sources routing page and select a source, and the WING will send it to the channel you selected earlier. You can use the source solo to quickly preview sources without assigning them to channels.
USB Audio: In/Out
The In/Out setting controls the number of channels the internal USB audio interface exposes to a connected PC or Mac. You can reduce it if you're using a slow computer or have connection issues.
The options are:
- 2ch/2ch
- 8ch/8ch
- 16ch/16ch
- 32ch/32ch
- 48ch/48ch